
INSTALLATION INSTRUCTIONS ![]()
![]()
![]()
![]()
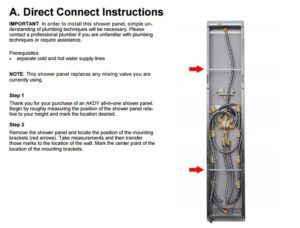
Ready to pamper yourself yet? If so, installing a Shower Panel is no more difficult than replacing your pre-existing shower arrangement with a new one. If you’re starting fresh with no existing shower, consult a plumbing expert prior to plugging one into your shower wall.
Each Shower Panel is unique and installation could vary from model to model. Be sure to read the manufacturer-issued instructions thoroughly before installing your new Shower Panel. The following illustrates how to install Fontana the top-selling Shower Panel on BathSelect.com.
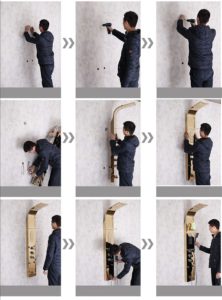
1. Preparing for installation
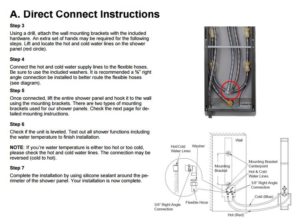
Install ½-inch IPS nipples for the hot and cold water supplies. The nipples should extend ? of an inch beyond the wall. The hot water supply is on the left, and the cold on the right. Install the wall surface material. Ensure the wall is watertight before installing the panel by applying a waterproof sealant, such as Teflon tape or plumber’s putty.
2. Installation
Install the elbows included with the panel and point them downwards. The elbow should extend no more than 1 ¼ inches from the surface of the wall. With a helper holding the panel in place, mark the positions of the screw holes and drill the holes with a 6 mm bit suitable for the wall surface.
3. Drop anchor
Install the anchors, and seal the wall with waterproof sealant. While holding the panel against the wall, install the provided gray plastic insert and the top screw into the anchor.
4. Make your connections
Install the center and bottom screws and washers. Connect the supply hoses to the hot and cold supply elbows and the inlet ports on the valve. Turn the water on at the main. Push the diverter stem up to turn the water on to the panel, and check the connections for leaks. When the connections are watertight, push the diverter stem down to cut the water.
5. Just a few easy installments
Install the side seals on the front cover, trim off any excess and push the front cover into place. Install the diverter sleeve. Make sure the indexing mark on the thermostatic mixer sleeve is at the 12 o’clock position. Install the thermostatic mixer handle, and tighten the handle screw with a flat-head screwdriver.
To install the diverter handle, tighten the set screw with a 4 mm Allen wrench. Place a black rubber washer in one end of the handshower hose, and fasten the hose to the handshower outlet port. Place the screen washer in the other end of the hose, and screw this end of the hose to the handshower. Place the handshower in the holder.
6. Adjust the Slider
You can make the slider easier or harder to move by using a 2 ½ mm Allen wrench. Turn the water on to the handshower, and turn the thermostatic mixer handle until the output water measures 100 degrees on a thermometer, then cut the water. Turning the handle clockwise makes the water cooler, counter-clockwise makes the water warmer.
Loosen the thermostatic mixer handle screw, and remove the handle. Replace the handle so that the safety stop override button is at the 12 o’clock position.
![]()