
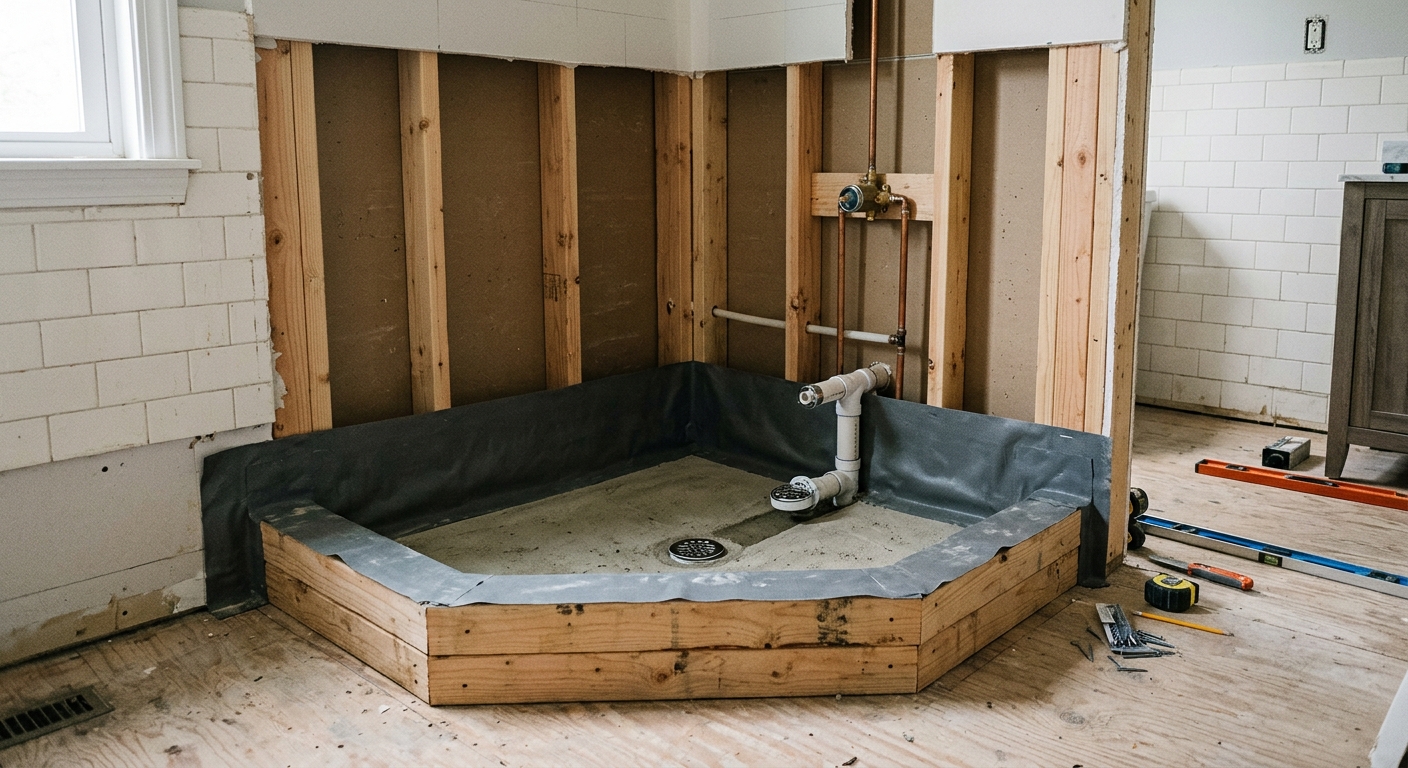
With the tub out, you’re now working with a rough opening that needs to be framed for a stall, sloped for drainage, and waterproofed before any tile goes up. This stage is where inspectors focus their attention, so get the curb height, pan slope, and drain size right before you close anything in with membrane or backer board.
Tools and Materials Checklist
Before you frame anything, confirm you have these on hand. Running back to the supply house mid-pour on a mortar bed costs you a full day.
- Framing lumber (2×4 or 2×6 depending on wall depth) and galvanized fasteners
- Shower pan liner (PVC or CPE) or a foam/pre-sloped shower pan system
- Dry-pack mortar mix or pre-formed pan base
- Waterproofing membrane (sheet, liquid, or fabric-and-thin-set sheet type)
- 2-inch ABS or PVC drain assembly (see drain section below)
- Level, 4-foot minimum, plus a torpedo level for the curb
- Notched trowel, margin trowel, and a mortar hoe or mixing paddle
- Utility knife, tape measure, and a chalk line
- Cement board or foam backer board and corrosion-resistant screws
- Seam tape and pre-formed inside/outside corners if using a sheet membrane system
Framing the New Stall Opening
Tub alcoves are usually 60 inches wide. If you’re converting to a shower-only stall, you can keep that footprint or narrow it. Most codes require a minimum interior shower dimension of 30 by 30 inches, though 32 by 32 or larger is more comfortable and easier to waterproof cleanly at the corners.
Frame the opening plumb and square first. Use a 4-foot level on both jack studs and check diagonals corner to corner. Out-of-square framing shows up later as uneven tile cuts and a curb that doesn’t sit level. If you’re relocating the showerhead or valve, rough in that plumbing now, before you close up any wall, since the backer board and membrane go on after framing is finalized.
Blocking matters here. Add horizontal 2x blocking between studs at grab-bar height (if you’re installing one) and behind where the valve and shower arm will sit. Fixture manufacturers publish rough-in specs for valve bodies and diverters, so check those before you box in the wall. If you’re also swapping in new bathroom fixtures at this stage, such as replacing old bathtub faucets with a shower-only trim kit, confirm the new valve’s rough-in dimensions match your existing supply lines before you frame around them.
Setting Curb Height and Width
The curb is the threshold you step over entering the shower. The IRC and IPC allow curb heights between 4 and 9 inches, though most residential installs land at 4 to 6 inches for accessibility and ease of entry. If the household includes anyone using a walker or wheelchair, consider a curbless or low-curb design instead, which requires a different pan slope strategy discussed below.
Curb width should match your wall thickness, typically 4 inches for a 2×4 wall with backer board and tile added on both faces. Build the curb from pressure-treated 2x4s or solid-cured mortar, not untreated lumber, since it sits directly in the wet zone. Slope the top of the curb slightly toward the shower interior, about 1/4 inch across its width, so water sheds back into the pan rather than pooling on top.
Pan Slope and Drain Placement
The shower pan must slope 1/4 inch per foot toward the drain. That’s the standard used in both the IPC and most manufacturer install guides, and it’s the number inspectors check with a level and a straightedge. On a 32-inch-wide pan, that means the perimeter should sit roughly 1/2 inch higher than the drain at the nearest wall, and more at the far corners depending on drain placement.
Center drains are still the most common because they simplify slope on all four sides equally. Off-center or linear drains (used with some pre-sloped foam pan systems) shift the slope calculation, so follow the pan manufacturer’s layout diagram rather than eyeballing it.
Here’s the drain sizing question that catches people converting an old tub-shower: tub drains are almost always 1.5-inch, while current plumbing code requires a minimum 2-inch drain for shower stalls. That’s because a shower has to clear water faster since it has no basin depth to hold standing water like a tub does. Check this now, because the drain size determines what fitting you need at the pan liner and whether your existing waste line requires a coupling change.
| Item | Tub-Shower Combo | Shower-Only Stall |
|---|---|---|
| Drain size | 1.5 inch | 2 inch minimum |
| Pan slope | N/A (tub basin) | 1/4 inch per foot to drain |
| Curb height | Tub wall height, 14 to 16 inch | 4 to 9 inch per code |
Waterproofing Membrane Layer Order
Get the layer order right or you’ll trap water inside the wall assembly instead of directing it to the drain. Working from the structure outward, the order is:
- Framing and blocking, inspected and squared
- Pre-slope mortar bed (if using a traditional mortar pan) sloped 1/4 inch per foot to the drain, allowed to cure before the liner goes down
- Pan liner (PVC/CPE sheet) or integrated membrane, draped up the walls at least 3 to 4 inches above the finished curb height, with corners folded and sealed per the liner manufacturer’s method, not just caulked
- Drain clamping ring set into the liner at the weep holes, so water that gets under the liner still reaches the drain
- Top mortar bed poured over the liner at the same 1/4 inch per foot slope, forming the finished walkable pan surface
- Wall membrane (sheet or liquid-applied) overlapping the pan liner upturn by at least 2 inches, sealed at every seam, corner, and penetration
- Backer board over the wall membrane, or membrane-over-backer-board if you’re using a liquid or fabric system rated for that order (check the product’s install guide, since systems differ here)
If you’re using a one-piece foam shower pan instead of a mortar bed, steps 2 through 5 collapse into a single pre-sloped unit. You still need to integrate the wall membrane with the pan’s flange per the manufacturer’s flashing detail.
Inspection Points Before Tiling
Most jurisdictions require a flood test on the pan before you tile: plug the drain, fill the pan with water to just below the curb height, and let it sit for 24 hours. No drop in water level means no leak. Do this before you close in any wall backer board over the membrane, since a failed test is easy to fix now and a nightmare after tile is set.
Cure time before tiling depends on your membrane type. Traditional dry-pack mortar beds typically need 24 to 48 hours before you can safely work on top of them. Liquid-applied membranes vary more, some rated for tile application in as little as a few hours, others requiring a full 24 hours between coats plus another cure period before tiling. Check the product data sheet for your specific membrane, since this is the number inspectors and warranty claims will reference if something goes wrong later.
Before you mix your first bag of thinset, walk the stall one more time. Confirm the drain is set at the correct height relative to the finished pan surface, confirm the curb is level along its length, confirm the wall membrane fully overlaps the pan upturn with no gaps, and confirm you’ve documented or photographed the flood test. These four checks take fifteen minutes and they’re exactly what a building inspector looks for at rough-in. If any of them are wrong, it’s a same-day fix now and a torn-out tile job later.